As I start to update my lab with a fresh new build, I wanted to make sure I have all the tools i’ll need to take the Automation journey and to sharpen my skill-sets around the tools that VMware offers, PowerCLI, vCenter Orchestrator, and vCloud Automation Center.
In the past I have seen vCenter Orchestrator installation and configuration a bit painful and I have read in other blogs and social networks that I wasn’t the only one having issues with the initial configuration.
I’m happy to report that the latest Appliance version of vCO is a breeze to install and configure just like many of VMware’s appliance-based solutions like the vCenter Server Appliance and the vCenter Support Assistant, to name a few. VMware is making it much easier to deploy these solutions with the appliance model, at the same time, lessening some of the license burden that our customer’s bear regarding Operating Systems and Database licensing.
Of course, prior to deploying the .OVA, we want to make sure that we have all the information we will need prior to the installation such as DNS Name and Entry, IP information, and passwords for both root and vmware built-in accounts.
Review the details and Click Next
Accept the EULA and Click Next
Select the Name and Folder and Click Next
Select the Storage and Click Next
Setup your Network that vCO
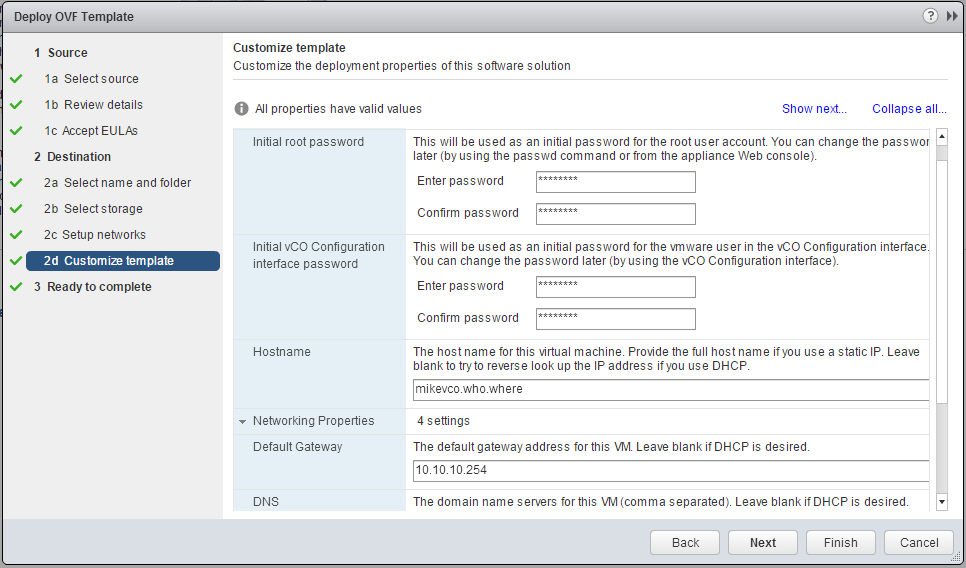
Give password to root and VCO interface password
also provide hostname: FQDN and DNS Information:
Check Power on after Deployment and Click Finish
When vCO powers on wait for some time to loadup vapp, once it is completely powered On. You can access this by going to this link:
Log in as root and the password
If you’ve already worked with any VMware Appliances this interface should be very familiar. Here we validate all my settings, change my Timezone
check for updates, if you have downloaded latest version no need to perform update check.
Now we are ready to move on to the vCenter Orchestrator Configuration which you can access by going to this link:
This time, log in as vmware with the password you chose during deployment.
Let’s move to Authentication in the left hand column. Choose SSO as your Authentication mode and supply the SSO server information and credentials and select Register Orchestrator. In my case, it found my AD as a valid SSO Authentication Source and I listed Domain:Domain Admins and selected Update Orchestrator Configuration.
*Very important: The next step is to restart the vCO Server Service. I found that this is required to accept the changes
Choose Startup Options in the left hand column and click the Restart service link under vCO Server.
After the service has been restarted now we are ready to add our vCenter Server. Choose vCenter Server (5.5.2) in the left hand column and the New vCenter Server Host tab, fill in all the appropriate information to add the vCenter Server and choose Apply Changes:
And that’s it for the basic install. Now let’s go check the vCenter Web Client to make sure that vCO is linked to vCenter and let’s test a Workflow to validate functionality.
Launch your Web Client and Select vCenter Orchestrator under Inventories:
Here we can now see one vCO Server listed
Let’s test a workflow. Click on Scheduled workflows then Schedule a Workflow. Expand the vCO server and you will see a list of Library folders that contain built in, out of the box workflows for Orchestrator. Scroll down to vCenter and expand the folder to Host management, then Basic. Here you will see a list of prebuilt Workflows. We will test vCO functionality by simply putting a host in maintenance mode so choose Enter maintenance mode and then hit Next:
Click on the + symbol next to the empty field under Host to put in maintenance mode then select Filter and choose the host:
Click OK then click Next. Choose Run now then hit finish.
Now we can see VM’s are being migrated after a Maintenance Mode operation has been kicked off:
And here is the outcome from the Workflow:
There ya have it. We installed and configured the vCenter Orchestrator Appliance and ran a simple built-in Workflow to validate functionality.


Comments
Post a Comment